Simple Spa Maintenance Tips for Long-Lasting Relaxation

Maintaining your spa is essential to ensure a clean and relaxing experience every time you step into your personal oasis. While spas can be a wonderful addition to any home, providing much-needed relaxation, they require regular care to function at their best. Here are some straightforward maintenance tips to keep your spa in top condition, allowing you to unwind without any worries.

First and foremost, regular cleaning is paramount. Empty and clean your spa at least once a month to prevent the buildup of dirt and bacteria. Start by draining the water using the pump or a submersible pump, then scrub the interior surfaces thoroughly, paying extra attention to the waterline, as this area is particularly prone to scum and dirt accumulation. A non-abrasive cleaner and a soft brush will do the job without damaging the spa’s surface. Rinse it well and you’re halfway done! Before refilling, though, ensure all filters and other cleaning equipment are clean and ready to go for the next use.

Next, monitor and maintain the water’s chemical balance. Test the water regularly using a reliable testing kit, which will help you understand the current state of the water’s chemistry. Aim for a pH level between 7.2 and 7.8, and maintain the alkalinity at around 80–120 parts per million. You can use various water adjustment products, such as pH increasers or decreasers, to regulate these levels. Additionally, ensure the sanitizer (such as chlorine or bromine) levels are optimal, as these prevent bacterial growth and maintain water clarity.

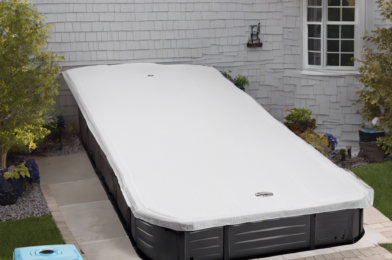
Keeping your spa covered when not in use is another simple yet effective maintenance tip. A good-quality cover will not only maintain the water temperature, thus saving energy, but also prevent debris like leaves and insects from falling into the water. This will reduce the need for frequent cleaning and water changes. Furthermore, a cover can help retain moisture and prevent water evaporation, leading to less frequent refills and reduced water costs.


Top 10 Tools Every DIY Enthusiast Should Own

Whether you’re a seasoned DIY expert or just starting to dabble in home improvement projects, having the right tools can make all the difference. That’s why we’ve compiled a list of the top 10 must-have tools for every DIY enthusiast to ensure you’re well-equipped for your next project. Get ready to roll up your sleeves and dive into the world of DIY with these essential companions!

1. The Versatile Drill: A drill is an absolute necessity in any DIY enthusiast’s toolkit. From assembling furniture to hanging shelves, a drill with various bits allows you to tackle a wide range of tasks. Look for a cordless drill with adjustable torque settings for added convenience and versatility.

2. Measuring Tape: Precision is key in DIY, and a reliable measuring tape is your best friend for accurate measurements. Opt for a durable tape measure with both metric and imperial units to cater to different project requirements.

3. Hammer Time: A sturdy hammer is a timeless tool. Whether you’re driving nails, dismantling objects, or hanging picture frames, a good hammer will provide the necessary force. Consider investing in a claw hammer, which offers the dual functionality of driving and removing nails.

4. Level It Up: Say goodbye to crooked picture frames and uneven shelves with a spirit level. This simple yet indispensable tool ensures everything you install is perfectly horizontal or vertical. A small torpedo level is handy for tight spaces, while a longer level can be useful for larger projects.

5. Saw Power: For cutting through wood, metal, or plastic, a versatile saw is essential. You can choose between a traditional hand saw or a power saw, depending on your needs and skill level. A jigsaw or circular saw can make quick work of cutting materials, but always prioritize safety when using power tools.

6. Pliers and Wrenches: These hand tools are essential for gripping, turning, and holding various objects. Pliers come in different types, such as needle-nose pliers for tight spaces and adjustable wrenches for tightening and loosening nuts and bolts.

7. Sandpaper for Smooth Finishes: Achieve a professional finish on your projects with sandpaper. From smoothing rough surfaces to preparing wood for painting or staining, sandpaper in various grits will help you achieve the desired outcome.

8. Safety First: DIY projects can be fun, but safety should always come first. Invest in a good pair of safety goggles to protect your eyes and gloves to keep your hands safe. A dust mask is also essential when working with wood, paint, or other materials that may create airborne particles.

Budget-Friendly DIY Home Upgrades for Beginners

Making your home feel like a personalized sanctuary doesn’t have to break the bank. Whether you’re a seasoned homeowner or just starting out, there are plenty of budget-friendly DIY projects that can transform your living space. Here’s a guide to some easy and cost-effective home upgrades for beginners looking to add a touch of style and functionality to their abode.

Enhance Your Walls with a Fresh Coat of Paint
One of the simplest and most affordable ways to refresh your home is by painting. A new color can instantly change the mood of a room, making it feel more spacious, cozy, or vibrant. Opt for neutral tones like off-white, beige, or light gray for a timeless appeal. If you’re feeling adventurous, add an accent wall with a bold color or a trendy pattern. Painting is a straightforward DIY task, but ensure you prepare your walls properly by filling any holes or cracks and cleaning the surfaces before you begin.

Update Your Kitchen with Inexpensive Hardware
The kitchen is often the heart of the home, and giving it a facelift can be exciting. Instead of replacing cabinets, which can be expensive, consider updating the hardware. Swap out old knobs and handles with stylish, modern options. You’ll be amazed at how this simple upgrade can make your kitchen feel brand new. Local hardware stores often have a wide variety of options, and online retailers even offer unique, budget-friendly choices.

Create a Feature Wall with Peel-and-Stick Wallpaper
Wallpaper is back in fashion, but it doesn’t have to be permanent or expensive. Peel-and-stick wallpaper is a beginner-friendly option that allows you to experiment with patterns and textures without the long-term commitment. Create an eye-catching feature wall in your bedroom, living room, or even the bathroom. This easy-to-apply and remove wallpaper is perfect for renters or those who love to change their décor frequently.

Step-by-Step Guide to Installing a Whirlpool Cover

Are you ready to transform your bathtub into a relaxing whirlpool experience? Installing a whirlpool cover is a fantastic way to enhance your bathroom and maintain the cleanliness and safety of your whirlpool system. Follow this comprehensive guide to ensure a seamless installation process.

Begin by gathering the necessary tools and equipment for the installation. You’ll need a screwdriver, a drill with appropriate bits, the whirlpool cover kit, and optionally, a partner to assist you. Ensure you have the correct cover size for your tub, as proper measurements are crucial.

Start by removing any existing covers or fixtures from your bathtub. Use the screwdriver to carefully detach any screws or fasteners, being mindful not to scratch the tub’s surface. Clean the area thoroughly to ensure a proper seal for your new whirlpool cover.

Position the new whirlpool cover over the tub’s opening, ensuring it aligns perfectly with the edges. Most covers will have pre-drilled holes or marked areas where you need to drill. Secure the cover in place using the provided screws or fasteners, tightening them evenly to avoid warping.

For an added layer of protection, consider using a waterproof sealant along the cover’s edges. This will prevent water from seeping underneath and causing damage over time. Allow the sealant ample time to dry before proceeding.

Test the functionality of your whirlpool system by filling the tub and activating the jets. Check for any leaks or issues with the cover’s placement. Proper installation should result in a seamless experience, providing both relaxation and peace of mind.

Maintaining your whirlpool cover is essential to ensure its longevity. Regularly clean the surface using mild, non-abrasive cleaners to prevent dirt buildup. Inspect the cover’s fasteners periodically and tighten as needed to maintain a secure fit.

If your whirlpool cover features additional accessories like air controls or lighting, make sure to install and test these components as well. Follow the manufacturer’s instructions for any feature-specific installations.

By following this step-by-step guide, you can confidently install your whirlpool cover, ensuring a spa-like experience in the comfort of your home. Enjoy the benefits of your whirlpool system while keeping it protected and well-maintained.

How to Choose the Best Pool Cover for Your Home Spa

Having a home spa is a wonderful way to relax and unwind, and adding a pool cover can enhance both its functionality and aesthetics. Choosing the right cover can be a game-changer, ensuring your spa remains in excellent condition while saving you time and money. Here’s a comprehensive guide to help you select the perfect pool cover for your cherished home spa.

When embarking on your pool cover journey, consider the primary purpose you want it to serve. Are you looking for a cover that provides superior insulation, helping to retain heat and reduce energy costs? If so, a well-insulated, solar pool cover might be your best bet. These covers are designed to capture the sun’s rays, transferring the heat to your spa water. This not only keeps your spa warm but also reduces the workload on your heater, potentially extending its lifespan.

Alternatively, if safety is your top priority, particularly if you have children or pets, a rigid, lockable pool cover could be ideal. These covers provide a solid barrier, preventing accidental access and offering peace of mind. They are designed to distribute weight evenly, ensuring they can support a person’s weight in an emergency.

Maintenance is another critical factor in choosing a pool cover. Automated covers, for instance, roll on tracks and can be easily operated with a simple turn of a key or the push of a button. This convenience not only saves time but also encourages regular use, making it a practical choice for busy individuals and families.

In terms of aesthetics, consider a custom-made pool cover that seamlessly blends with your spa and its surroundings. Customization allows you to choose from various materials, colors, and designs, ensuring your spa remains an attractive focal point of your outdoor space.